Monday, 24 June 2013

Walnut Locket


*Tiny pewter nut which happened to have a convenient hole 
for a hook not included*

Ever get tired of littering yourself with those annoying tiny pieces of walnut shell EVERY TIME you crack one open for that walnutty goodness inside? Here's a way to recycle it into a nifty little locket without half the mess. Providing you cracked it open with hours of delicacy with a small saw.

This one needs:
  • A walnut (maybe a couple if it doesn't work the first time)
  • a small saw
  • a drill with a teenie tiny drill head
  • Thin wire
  • Thicker metal wire
  • brass shim or other thin, easy to bend metal
  • possibly a hammer and nail.

First you need to crack open that walnut. With a small saw carefully begin to work down the natural seam around the middle. Depending on the unique walnut, this can be easier or harder. It took me a good hour or so to do it the first time (going uber delicate), it didn't help that the first time it decided to crack the wrong way. Just be gentle with it and you'll get there eventually.


Eat that nut. Nom nom. If you're allergic to walnuts now proceed to inject your epipen and call your local emergency number. After that kerfuffle, proceed to carefully scrape out the inside of the nut with a knife or otherwise so you have the two empty shells.


Now to make that hinge. I used brass shim and tin for my versions, but any thin metal that can be easily cut, drilled and folded should be fine. To make the hinge I got two small strips of brass shim, cut twice to the middle and then folded two of the three 'fingers' over on either side of the middle, and then folded the middle down on the second. Then loosely folded over the other fingers so that there was a small gap:


Shown here in paper. Two cuts to middle


folded down tight/clamped


Loosely to make the loop

  Trim down the ends to make the neat and you should get something that looks a bit like this:


Now you're going to need small holes in the hinges and the walnut shells. You could use the small drill and piece to make three sets of double holes, but I find that with brass (and thicker tin) it's better to just use a hammer and nail for the hinges. also thread a piece of wire metal through the loose loops to connect the hinges and, using pliers, bend the ends of it to keep it in place.

Holding the two walnut sides together, carefully aline the hinge where you want it to be and mark with a pen through the holes onto the walnut shells. Using the small drill carefully and very, very delicately drill with the correct sized head through the walnut shell where you marked it. While you're at it, using a bigger drill head, drill though the top of one where you're going to thread the string/necklace connecting wire/cotton/wool/thingamajig.

Using the pliers and thin metal wire, connect the hinges to the walnuts (twist and bend wire on the inside for security) and you should have something that looks a bit like this:


Thread some ribbon or string through the top and knot and now you have a little locket pendant where you can hold teenie tiny photos or teenie tiny pewter nuts or teenie tiny miscellaneous treasured stuff. It's also optional to put a little hook and latch on the other side just to keep it a little more secure if it doesn't close completely. Now you have you're own little walnut locket that lasts until the use-by date sets in... yeah I don't know what that is, but so far a locket made by a two year old walnut a year ago (yes, somehow I know it's that old) has lasted.

 Estd. 2012

Friday, 14 June 2013

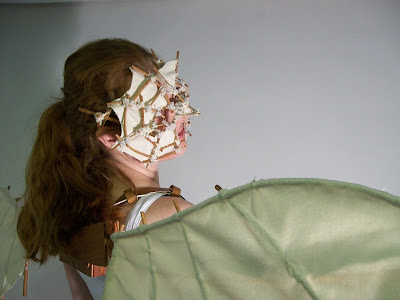
THE inventor's masquerade mask


Here's a mask that DaVinci himself would sue over copy right laws for.... or perhaps Renaissance Spiderman... No that's stupid. I mean everyone knows a Renaissance Spiderman could never compete with Leonardo DaVinci who, as we all know, is Renaissance Batman.

For this one you need:
  • Willow sticks
  • String
  • Canvas cloth (or otherwise)
  • block of wood and nails (optional)
  • needle and white thread
The first thing you're going to need to do is learn how to do a clove hitch and bind 2 sticks together, because you'll be stuffed otherwise. Here's a helpful diagram:

 And here's an even more helpful Youtube video by the ever helpful Howcast

As for the binding of two (crosshatch), after doing the clove hitch on one, simply put another over and begin to do an over and under action a couple of times, then tie around tightly and knot of, as this helpful diagram shows:

Clove hitch, over and under, around and around tightly, knot off and cut. Thank you Girl Guiding

Now you know that, you're going to be a wizard with this. Now you need to warp the willow sticks (basically bend to the shape you want it to be). Willow is brilliant for this. find some pieces that aren't too brittle and thin and dunk in water for around twenty minutes or more. The longer you leave it, the more flexible and warpable the willow is going to be. I personally made a rough frame using nails to hold it in place as it dried and stayed curved:


However I've also done it  by just gently bending it and holding it in place until it had bent and stayed for long enough. Remember BE GENTLE when doing this. AND patient - a lot of wood is probably going to snap and again you will feel the urge to hurt it and the art teacher whose in perfect bullseye range. Now personally I cut and shaped my mask to be this shape: 

Nananananananana Renaissance man!

But again, it can be personalized and changed etc. This one's supposed to look a bit like a DaVinci glider (nose piece being the glider front, the 'mono-brow' being the tail). Starting with the circular eye pieces (be patient enough and you CAN bend it that far - tie up with clove hitch and cross hatch etc.), I tied on the 'web' frame using the clove hitch and crosshatch knots. Then I attached the two with a triangle piece across the nose. In the end it looked like this:


The whole thing will be kind of bendable, but that'll just make it easier to shape it to your face. As for attachments you could use string, but I found it easier to use two sticks on either side to make something almost like a pair of glasses (easy to shorten and lengthen for size), which I attached to the frame on either side of the eyes (using glasses helps for reference).

Finally you just need to cut canvas cloth to sizes and sew on. Being lazy I stopped any fraying with PVA glue, but it's seemed to work so far:


And so you have a mask to fight crime Renaissance style... or you know, just look unique at the next masquerade ball your invited to. The warping and knots are just a useful thing in general too, it can go well beyond masks to help with your own personal Renaissance batman wings:


Plastic Plant Pot Gauntlets


Ah yes, now you too can own the gauntlet Lord Sauron uses for lazy Sunday gardening as you rule lord of the Shed and command your vast army of Gnomes, smiting weeds and breaking the will of Dandelions as you conquer middle earth... you know, that plot between the cabbages and the runner beans.

This little project needed:
  • 1 old garden glove or otherwise.
  • Around 4 to 5 small - medium plastic plant pots of your preferred colour
  • Rivets (or other way to securely attach the parts)
  • Washers to use with rivets
  • A rivet gun
  • A drill
  • Possibly some pins/tacs.
  • Scrap paper (Optional this just helped me sort out sizing and shapes in the early 'prototype'
So I began with a little concept art:
Shameless showing off of terrible sketching skills


Then I got on with the making. I cut off the bottom of two pots which would be the 'arm'/wrist pieces. For now I just used pins to hold everything in place.

Slightly blurred, this picture includes the paper 'prototypes' as I worked it out.

With the third plant pot you cut out the bottom once again, only this time you need to cut it in half and cut out a small area where the thumb will be. A bit like this:

WARNING: Not to scale, just a guide, also varies depending which hand your doing.
So now you should have something a bit like this:
 
 You can see a lot of paper in these pictures, this was just my way of working out the exact size/shape I needed to cut out of the plant pots for the finger pieces. Each finger/thumb has two pieces to them and you can vary them as much as you want, but here's the shapes I went for:

Thumb piece
Top piece: 6cm x 4cm
Bottom piece: 6cm x 7cm

 Finger pieces:
Top piece: 6cm x 4cm
Bottom piece: 4cm x 7cm

 After I cut out the thumb and finger (x4) pieces, I worked out how/where to connect them all using drawing pins - it helps to see what the finished thing will look like and where it will look best. So now you have to drill holes through all of it.

You're going to need to use a drill head that's the same width as the rivets you're going to use - preferably the smallest you can find. Drill holes, using the pin holes as guidance and using a small sharp implement, make small holes in the glove as well - not massive ones, tiny ones which you can then use a rivet to successfully push a correct size hole through. (depending on the glove material, you made need to use other means - leather may need you to hammer a nail/small drill through instead).

As to where you put the holes, I put two holes on either side of the finger pieces and three on the wider thumb. The plastic should easily curves around, but if not try bending it slowly first or even applying a curling iron to it.

Now when I did this project I foolishly went from the wrist first riveting, making it near impossible for me to do the fingers. So to make it a thousand times easier for yourself, rivet through the correct holes from the smallest finger at the tip first using a rivet gun and a carefully balance washer on the inside of the glove over the rivet (and that's going to be fiddly. REAL fiddly. Make this part a practice of patience and fighting the will to throw it hard against the art teachers). After that do the tips of each finger and thumb, then do the top finger/thumb pieces so that your glove now looks like this (but with plastic instead of paper and rivets instead of tape):


Now the easier part of attaching it to your half cut pot. I personally riveted the holes and glove in this layout:


As you can see its sort of like one rivet (on the main part of the glove) for each finger. So now you just need to make the 'sleeve'/wrist... thing. Before you attach this to the glove, you need to attach the two pieces together in a way that's going to let you move your wrist. For this I simply did two rivets on either side with one slotted into the other as seen here - that way its movable. Do a similar thing (and in the same position) with the half pot already connected to the glove and the now 'middle' pot with the glove coming through.

The rivet you see there poking out is the first of two I used to secure the glove in place, one above and one below, which is where I left the riveting, but you could try other patterns/positions to rivet, or more if you need it to secure. If you want it even MORE secure, just apply some super glue/adhesive to the different parts.


And there you go, a plant pot gauntlet to wield your infinite gardening power upon the world. And it doesn't have to stop at gauntlets, it can be entire outfits too...

Lord of the Gnomes

What's with all the Oxymoron-ish titles?

I'm a maker. I like to make things. Things that sometimes have absolutely no purpose, like a metal rabbit head which your art teacher repeatedly asks about and for the reason you wasted valuable copper wire to make it:

"Well I felt like making a sculpture and that sculpture happened to be a rabbit.... head."

"But what's the purpose!?"

"....Being a rabbit head?... made out of metal?.... Looks... interesting? Maybe?... A little?"

And that's about as deep as my philosophical art meanings go most days. I vowed to have a little more purpose and the art teachers seemed a little more impressed (if not confused). So here on this blog are some projects of sometimes useful and sometimes useless things I've made, that maybe you could make, which don't really solve any problems, that sometimes look nice and sometimes make a good costume, but which mainly are truly uninventive even if they are unique.